Quantcast
Channel: C++博客-
Viewing all 101 articles
Browse latest View live

OpenGL点阵字体绘制终极解决方案!

$
0
0

OpenGL点阵字体绘制终极解决方案!哈!

tsuui posted @ 7 years ago in Coding with tags OpenGL 中文显示 freetype , 12160 readers

事情总在变化, opengl迎来了3.3以及4.1的进化, 相信今后的扩充也会朝着这个方向. 对于字体渲染方面, 也并不是什么坏事. 今后有时间再写篇关于3.3和4.1的全屏字体渲染的新方案, 仍然是结合freetype2的, 相信随着freetype2的进步, 和对它的逐步认识, 应该会比现有方案更简单高效... 现在最最最重要的事是...睡觉!!!

对于此文, 大家仅做参考吧.


经过多次修改测试,字体问题终于有了个比较完美的解决方法了,贴出来亮亮~~

此法可以说完全是“红宝书”(即《OpenGL编程指南》)所赐, 此篇也不过是一些实践心得和我自己对字体显示方法的一些体会罢了。

下面就来介绍这个所谓的“终极解决方案”,对于待解决的各种问题,都有着多种可供选择的方案,就让我来边比较边描述吧:

  1. 渲染方式和帧数

不管是不是OpenGL平台, 在每个3D平台中,  点阵字体无非两个用处: 要么做效果,要么做提示。效果就是标题文字、按钮之类的,我们一般称之为banner,titile,caption的东西; 提示就是指一些有动态更新要求的文字,如控制信息提示,  调试模式下的对象名称、坐标等, 还有就是交互场合,比如聊天。

两种应用需求有所不同,但不管是哪种,在OpenGL中我能找到的直接支持字体的,只有三种方法,选择他们的标准只有一个——速度:

● glBindTexture, 纹理贴图,连文字带背景做好一张大图,  按需地选取各个文字子图像,再贴到相应位置的矩形上。贴图能够实现的文字效果最多,你可以把文字纹理映射到空间任意位置的巨型上,可以随意的旋转缩放和变形。在不要求大量动态更新文字内容的地方,可以选用此方法。大部分的小型3D游戏,都采用了这样的方式显示文字,速度够快,能实现所有的变换效果。

不足之处是:

很难实现多颜色混合显示的文字,因为为纹理设置颜色需要的步骤十分繁琐,需要反复切换和设置纹理函数和像素传输转换函数,难免影响性能;

文字内容不能灵活的更换, 除非你打算用很多碎小的纹理来拼凑文章;但随着碎小图片的增多,顶点的和纹理对象也大量增加,需要大量额外的片段处理和过滤操作,会明显拖慢处理流水线,在要求显示大量动态文本的场合下力不从心。不过好在OpenGL在处理纹理对象时多数情况是使用硬件实现的,速度不会慢太多,但也绝对不够块(你可能玩过这样的3D游戏:图像效果场景规模都一般,可鼠标速度慢得难以忍受,出现这种情况,九成的原因是顶点片元过多造成的,单次场景同时显示的纹理片段过碎过多,都会成倍地同时增加顶点和像素片元,拖慢速度,鼠标有时间响应,却没时间画出来);

还有就是变换拉伸后,纹理字体会出现模糊的现象,有些人建议打开Anisotropic Filtering(各向异性过滤)开关, 利用反走样解决,但效果似乎也不稳定,在转角过大、近距离或光线角度太偏的情况下,效果就越来越差了,我想这是纹理映射的通病吧,不可能就一张图你从哪里看都一样的清晰啊,也有人用多等级的纹理和Mipmap解决,本人没试验过(比较麻烦)所以没什么发现权。

● glDrawPixels,像素绘制,任何纹理能够支持的图像格式,它都能支持,缩放也很简单,也可通过设置像素传输和像素封装函数实现一些其他的效果。

缺点是:

他同纹理一样,很难灵活设置颜色; 

只能在光栅上绘制,若需要各种变换效果,还要开辟额外的辅助缓冲和纹理对象;

而最大最大的问题就是速度! 像素在显示之前的处理动作是没有经过加速的,也就是说不管你有没有把他编译到显示列表,像素的转换传输等动作每次都照做不误,它不同于纹理对象中的像素,多数OpenGL实现没有对它开辟专属的显存区域(这种说法有待考证,但实际测试中效率确实很差,编程指南中有特定篇幅介绍了如何提高像素绘制的效率,但即使牺牲一切资源来保证效率,实测效果仍然很难让人满意)。

所以,虽然 glDrawPixels似乎是三种方法中最简单有效的, 可实际运行起来却是三种方法中最慢的!所以如果你要绘制大量点阵字,又想保证帧数的话,宁愿去考虑纹理贴图,也不要在这个函数上花太多心思。

● glBitmap,位图,如果你想在你的3D引擎里添加一个控制台,这个是唯一的选择,96个可打印字符做成位图映射到索引为0x20~0x7F的显示列表,供随时调用。就算直接用glBitmap也来的及,对帧数的影响也不算大,  三种方法中它的速度最能让人满意, 且能通过设置光栅颜色灵活改变位图字体的颜色。想象一下,如果你的控制台里的warning error 普通的log message和user command分别使用了不同的颜色显示,而为实现这个既酷又实用的效果,所付出的代价仅仅是在设置光栅前加个glColor这么简单而已。

缺点:

只能在光栅上绘制,若要缩放旋转之类的变换,需要额外的处理工序,但由于其本身的速度优势,这些工序一般不会对帧数有太大的影响;

另外由于位图只有黑白单色,无法表示灰度,锯齿问题严重,如果只显示英文字体还好,一旦要显示中文,文字效果很差,实在是亵渎中华文化!当然如果你知道怎么在OpenGL里实现一个和ClearType类似的技术,那另当别论。


以往对于全屏字体渲染,glBitmap一直是我心中的痛,难以割舍它的高速,又无法忍受它的效果, 直到前一段在读编程指南时,无意间发现了一种利用glBitmap显示反锯齿字体的技巧。当时反复读了几次,貌似明白了上面的意思,拿到机器上试了试, 果然天才, 很好地解决了锯齿的问题,相见恨晚,感叹读书太不认真,怎么早没发现!!  下面简单描述一下这个方法:

对于一副256灰度图像,每个像素使用了一个字节表示0~255个灰度,而位图只有一位0或1,乍一看不太可能,但位图可以灵活设置颜色的特点,成了突破口。既然位图在设置光栅前可以使用glColor为光栅指定"当前光栅颜色",不仅如此,我们还可以指定颜色的alpha值,从而绘制明暗相间的彩色位图,了解了?

把一个反锯齿的灰度字体图像分为多幅位图,假设分为4张位图,第一张:使灰度1~63的相应点置1,其他点置0;第二张:64~127的置1,其他置0...以此类推, 灰阶每上升64的点都集中到同一张位图上。然后,打开混合,使用4次glBitmap调用绘制出来,每次绘制前将光栅颜色设置成与图像对应阶段的灰度,像下面这样: 

GLfloat curColor[4] = { r, g, b, a*0.25f}; //假设当前颜色为 (r,g,b,a) for (int i=0; i<4; ++i) { glColor4fv(curColor); glRasterPosiv(curPos); glBitmap(w,h, 0,0, 0,0, bitmap[i]); //当前alpha增幅0.25, 4次增至1.0 curColor[3] += a*0.25f; } 

就相当于让一张256灰阶的位图降低到5灰阶。这么做的效果如何呢?

下图是我在glut这种超慢框架下的测试的:

中间的截图是用glDrawPixels在打开freetype2的autohinting选项下渲染的256灰阶字体, 上下两张截图都是使用glBitmap绘制的,没有打开autohintng,上面的是3副位图(4灰阶)/字,下面的是4副位图/字。glDrawPixels是使用了显示列表绘制全屏1003个汉字的,已经累成14FPS了,而glBitmap是没用显示列表的,同样1003字一屏,在glut下也能达到50FPS以上! 近乎完美!

(窗口分辨率是960x600)

 同时,由于每个像素变成了4个bit表示(4张图每张1bit),使存储字模所需的空间降至原来的一半。


  1. 字库和编码映射

除了glDrawPixels,每一种方法都有应用它的理由,但不管你用哪一种,要克服的最大困难除了渲染速度,就是字库问题了! 读取字库建议使用FreeType2这个开源目, 它支持当今几乎所有流行格式的字体文件,我们可以选择它来作为字体导入的工具,当然也可以把它link到你的程序中,实时的载入ttf字体并按需生成字模图像。解决字库的读取问题,FreeType2绝对是上上之选,就这么简单~

当然, 如果你只想支持普通的96个可打印字符,除了glDrawPixels,其他两种方式随便用——想要效果就用glBindTexture、想要简单方便就glBitmap,然后关掉浏览器、合上参考书,最多半个小时你的字体问题就有着落了! 可如果你想要支持中文??庞大的字库体积是你不得不考虑的另一个问题, 何为庞大?让我们简单地算下:

GB2312编码包含7445个字符,其中汉字6000多个,GBK编码下仅汉字就有20902个,最新国家标准GB18030-2005,总共76546个字符, 而目前的Unicode字符集,已经增至超过10万个字符,虽然现在还没有哪个unicode字库能支持到这么多字符(难道真的有?),但至少20000个还是有的! 而这些字符都是分散在编码空间中的,就是说编码是不连续的,不能使用连续的显示列表索引作简单的映射(即使连续,这么庞大的数目,就算显示列表没有上限,它所占据的显存空间也相当可观),因此不得不为‘字符编码’到‘字模索引/列表索引’建立查找表。

最猛的做法是,在内存平铺整张表,字模全部存入内存,一步索引到字模,生成显示列表,下次再绘制字模时只需索引到显示列表而不必去取字模。这样做好像也没什么问题,没什么问题?如果真的没问题就不会是最猛的了——对于GB2312和GBK这种"小型"多字节编码就需要尽1MB的空间,对于unicode最少最少需要近4MB的空间,而在这个大表里,八成以上的内容是普通人这辈子都用不上的,而每刷新一帧,你的每个要显示的字符都要重复查表一次,在这样大的空间中频繁查表,产生页交换的可能非常的大,速度不慢才怪,绝对不比你每次调用freetype实时转换灰阶来的快,而且还很浪费。

我建议的方法是利用std::map!当然如果你有自己的红黑树类和allocator也可以自己做一个map,效率上可能更胜一筹。map的作用是把字模信息映射到字符编码,动态的载入我们仅有可能用到的那几千个字模信息,这样既节省了空间(省点是点),又比较高效。另外,这里不必专门为map设定空间限制,map在到达一定大小后(大约7000个节点)或每过一段时间后将查找表clear掉就可以了,除非你要在程序里显示《说文解字》全篇,否则要让map增大到5000节点都是个相当有难度的工作。


  1. 定制自己的字体文件

哎……这也是被逼无奈,如果你梦想着自己的图行引擎能有全功能的中文支持(显示、输入),你必须一再考虑速度的问题!因为中文实在是太多了……而且万把字符一会要查表一会要转换图像一会又要排布文字,各个环节都不像西文那样方便直接, 都需要额外的繁琐的计算!如果你还要些特效,你一定会比我更吝啬速度。

实践证明,使用了定制点阵字体文件的方式后,不使用显示列表而是实时从内存取得字模再逐个glBitmap,其效率几乎可以和使用了显示列表的内嵌Freetype2的字体系统媲美。至于怎么建立自己的字体文件嘛,我的意见是:怎么方便怎么建,读着方便,用这方便就OK了,因为像这样的位图数据生成文件后数据是很“稀疏”的,很容易压缩和解压,所以空间上不必太担心(我自己做的24×24点阵字体文件,连带额外数据只有4MB多一点)。

其他的就没什么可说的了,要注意的只有三点:你需要一个有序的code-index表,为什么要有序?因为代码域很长而实际的可显示码点很稀少,在一个有序的静态表中二分查找是不二之选;你还需要为每个字模数据建立一个字模信息记录,记录啥?宽width、高height、列步进长度advance、行字节数pitch、字模数据指针等; 还有就是字模数据,如果你想更块一些,让每行像素的字节数扩充到4的倍数,浪费些空间可以再换些速度。


到目前为止我们基本完成了下面的要求:

1. 速度快,永远不能放弃对它的追求!

2. 省内存,CPU内存要省,GPU内存更要一省再省!

3. 美观,字是拿来看的,辛勤劳动不能仅因一个难看而被沦为劣质产品。

4. 简单,方法要简单通用!这个好像差点事.....

5. 支持海量中文,在新一轮的‘文字改革’到来之前,这永远是个艰巨的任务!

http://tsuui.is-programmer.com/posts/4252.html


zmj 2015-11-07 08:05 发表评论

Shadow Techniques for Relief Texture Mapped Objects

$
0
0
http://www.gamasutra.com/view/feature/2420/book_excerpt_shadow_techniques_.php

The following is an excerpt from Advanced Game Development with Programmable Graphics Hardware (ISBN 1-56881-240-X) published by A K Peters, Ltd.

--

Integrating shadows to the relief map objects is an important feature in fully integrating the effect into a game scenario. The corrected depth option (see Chapter 5), which ensures that the depth values stored in Z-buffer include the displaced depth from the relief map, makes it possible to implement correct shadow effects for such objects. We consider the use of stencil shadows and shadow maps in this context. We can implement three types of shadows: shadows from relief object to the world, from the world to relief object and from relief object to itself (self-shadows).

Let us first consider what can be achieved using stencil volume shadows. When generating the shadow volumes, we can only use the polygons from the original mesh to generate the volume. This means that the shadows from relief objects to the world will not show the displaced geometry of the relief texture, but will reflect the shape of the original triangle mesh without the displaced pixels (Figure 1).


Figure 1. A relief mapped object cannot produce correct object to world shadows using shadow volumes.

However, as we have the corrected depth stored in Z-buffer when rendering the lighting pass we can have shadows volumes from the world projected onto the relief objects correctly, and they will follow the displaced geometry properly. Self-shadows (relief object to itself) are not possible with stencil shadows.

Thus, using relief maps in conjunction with shadow volumes, we have the following:

  • Relief object to world: correct silhouette or displacement visible in shadows is not possible.
  • World to relief object: shadows can project on displaced pixels correctly.
  • Relief object to relief object: not possible.

Relief mapped objects integrate much better into shadow map algorithms. Using a shadow map, we can resolve all three cases; as for any other object, we render the relief mapped object into the shadow map. As the shadow map only needs depth values, the shader, used when rendering the object to the shadow map, does not need to calculate lighting. Also if no self-shadows are desired, we could simplify the ray intersect function to invoke only the linear search (as in this case we only need to know if a pixel has an intersection and we do not need the exact intersection point). The shader used when rendering relief objects to a shadow map is given in Listing 4.4, and an example is shown in Figure 2.


Figure 2. Using relief mapped objects in conjunction with shadow maps. Shadows from relief object to world.

To project shadows from the world to the relief map objects, we need to pass the shadow map texture and light matrix (light frustum view/projection/bias multiplied by inverse camera view matrix). Then, just before calculating the final colour in the shader we project the displaced pixel position into the light space and compare the depth map at that position to the pixel depth in light space.

#ifdef RM_SHADOWS
  // transform pixel position to shadow map space
  sm= mul (viewinverse_lightviewprojbias,position);   
  sm/=sm.w;
  if (sm.z> f1tex2D (shadowmap,sm.xy))
    att=0; // set attenuation to 0
#endif


Figure 3. Shadows from world to relief objects. Left image shows normal mapping, and right image, relief mapping (notice how the shadow boundary follows the displaced relief correctly).

An example of this approach is shown in Figure 3. This is compared with a conventional render using a normal map in conjunction with a shadow map. Thus, using relief maps in conjunction with shadow maps, we can implement the following:

  • Relief object to world: good silhouette and displacement visible in
    shadows.
  • World to relief object: Shadows can project on displaced pixels correctly.
  • Relief object to relief object: possible if full linear/binary search and
    depth correct used when rendering to shadow map.

Listing 4.4
Using relief mapped objects in conjunction with shadow maps.

float ray_intersect_rm_shadow(
    
in sampler2D reliefmap,
    in float2 tx,
    in float3 v,
    in float f,
    in float tmax)
{
  const int linear_search_steps=10;

  float t=0.0;
  float best_t=tmax+0.001;
  float size=best_t/linear_search_steps;

  // search for first point inside object
  for ( int i=0;i<linear_search_steps-1;i++ )
  {
    t+=size;
    float3 p=ray_position(t,tx,v,f);
    float4 tex= tex2D (reliefmap,p.xy);
    if (best_t>tmax)
    if (p.z>tex.w)
         best_t=t;
  }

  return best_t;
}

f2s main_frag_relief_shadow(
    v2f IN,
    uniform sampler2D rmtex: TEXUNIT0 , // rm texture map
    uniform float4 planes,     // near and far plane info
    uniform float tile,                  // tile factor
    uniform float depth)       // depth factor
{
    f2s OUT;

    // view vector in eye space
    
float3 view= normalize (IN.vpos);

    // view vector in tangent space
    
float3 v= normalize ( float3 ( dot (view,IN.tangent.xyz),
        dot (view,IN.binormal.xyz), dot (-view,IN.normal)));

    // mapping scale from object to texture space
    
float2 mapping= float2 (IN.tangent.w,IN.binormal.w)/tile;

    // quadric coefficients transformed to texture space
    
float2 quadric=IN.curvature.xy*mapping.xy*mapping.xy/depth;

    // view vector in texture space
    
v.xy/=mapping;
    v.z/=depth;

    // quadric applied to view vector coodinates
    
float f=quadric.x*v.x*v.x+quadric.y*v.y*v.y;

    // compute max distance for search min(t(z=0),t(z=1))
    
float d=v.z*v.z-4*f;
    float tmax=100;
    if (d>0)     // t when z=1
        
tmax=(-v.z+ sqrt (d))/(-2*f);
    d=v.z/f;     // t when z=0
    if (d>0)
        
tmax= min (tmax,d);

#ifndef RM_DEPTHCORRECT
  // no depth correct, use simple ray_intersect
  float t=ray_intersect_rm_shadow(rmtex,IN. texcoord*tile,v,f,tmax);
  if (t>tmax)
      discard ; // no intesection, discard fragment
#else
    // with depth correct, use full ray_intersect
    float t=ray_intersect_rm(rmtex,IN.texcoord*tile,v,f,tmax);
    if (t>tmax)
        discard ; // no intesection, discard fragment

    // compute displaced pixel position in view space
    
float3 p=IN.vpos.xyz+view*t;

    // a=-far/(far-near)
    // b=-far*near/(far-near)
    // Z=(a*z+b)/-z
    
OUT.depth=((planes.x*p.z+planes.y)/-p.z);
#endif

    return OUT;
}


zmj 2008-12-22 16:26 发表评论

QT定时器QTimer

$
0
0

在Qt中使用定时器有两种方法,一种是使用QObiect类的定时器;一种是使用QTimer类。定时器的精确性依赖于操作系统和硬件,大多数平台支持20ms的精确度。

1.QObject类的定时器

    QObject是所有Qt对象的基类,它提供了一个基本的定时器。通过QObject::startTimer(),可以把一个一毫秒为单位的时间间隔作为参数来开始定时器,这个函数返回一个唯一的整数定时器的标识符。这个定时器开始就会在每一个时间间隔"触发",直到明确的使用这个定时器的标识符来调用QObject::killTimer()结束。

    当定时器触发时,应用程序会发送一个QTimerEvent。在事件循环中,处理器按照事件队列的顺序来处理定时器事件。当处理器正忙于其它事件处理时,定时器就不能立即处理。

    QObject类还提供定时期的功能。与定时器相关的成员函数有:startTimer()、timeEvent()、killTimer()。QObject基类中的startTimer()和timerEvent()原型及说明如下:

intQObject::startTimer(int interval);

    开始一个定时器并返回定时器ID,如果不能开始一个定时器,将返回0。定时器开始后,每隔interval毫秒间隔将触发一次超时事件,直到killTimer()被调用来删除定时器。如果interval为0,那么定时器事件每次发生时没有窗口系统事件处理。

virtual voidQObject::timerEvent(QTimerEvent *event);

    虚函数timerEvent()被重载来实现用户的超时事件处理函数。如果有多个定时器在运行,QTimerEvent::timerId()被用来查找指定定时器,对其进行操作。

    当定时器事件发生时,虚函数timerEvent()随着QTimerEvent事件参数类一起被调用,重载这个函数可以获得定时器事件。

    定时器的用法如下:

//头文件

class QNewObject : publicQObject

{

    Q_OBJECT

public:

    QNewObject( QObject * parent = 0 );

    virtual ~QNewObject();

protected:

    void timerEvent( QTimerEvent *event );

    int m_nTimerId;

};

//源文件

QNewObject::QNewObject(QObject * parent )

    :QNewObject( parent )

{

    m_nTimerId = startTimer(1000);

}

QNewObject::~QNewObject()

{

    if ( m_nTimerId != 0 )

        killTimer(m_nTimerId);

}

voidQNewObject::timerEvent( QTimerEvent *event )

{

    qDebug( "timer event, id %d",event->timerId() );

}

2.定时器类QTimer

 定时器类QTimer提供当定时器触发的时候发射一个信号的定时器,他提供只触发一次的超时事件,通常的使用方法如下:

//创建定时器

QTimer *testTimer = newQTimer(this);

//将定时器超时信号与槽(功能函数)联系起来

connect( testTimer,SIGNAL(timeout()), this, SLOT(testFunction()) );

//开始运行定时器,定时时间间隔为1000ms

testTimer->start(1000);

...

//停止运行定时器

if (testTimer->isActive() )

    testTimer->stop();

  QTimer还提供了一个简单的只有一次定时的函数singleShot()。 一个定时器在100ms后触发处理函数animateTimeout()并且只触发一次。代码如下:

QTimer::singleShot( 100,this, SLOT(animateTimeout()) );

QTimer类提供了定时器信号和单触发定时器。

它在内部使用定时器事件来提供更通用的定时器。QTimer很容易使用:创建一个QTimer,使用start()来开始并且把它的timeout()连接到适当的槽。当这段时间过去了,它将会发射timeout()信号。

注意当QTimer的父对象被销毁时,它也会被自动销毁。

实例:

        QTimer *timer = new QTimer( myObject );

        connect( timer, SIGNAL(timeout()),myObject, SLOT(timerDone()) );

        timer->start( 2000, TRUE ); // 2秒单触发定时器

你也可以使用静态的singleShot()函数来创建单触发定时器。

作为一个特殊情况,一旦窗口系统事件队列中的所有事件都已经被处理完,一个定时为0的QTimer就会到时间了。

这也可以用来当提供迅速的用户界面时来做比较繁重的工作。

        QTimer *t = new QTimer( myObject );

        connect( t, SIGNAL(timeout()), SLOT(processOneThing()));

        t->start( 0, FALSE );

myObject->processOneThing()将会被重复调用并且应该很快返回(通常在处理一个数据项之后),这样Qt可以把事件传送给窗口部件并且一旦它完成这个工作就停止这个定时器。这是在图形用户界面应用程序中实现繁重的工作的一个典型方法,现在多线程可以在越来越多的平台上使用,并且我们希望无效事件最终被线程替代。

注意QTimer的精确度依赖于底下的操作系统和硬件。绝大多数平台支持20毫秒的精确度,一些平台可以提供更高的。如果Qt不能传送定时器触发所要求的数量,它将会默默地抛弃一些。

另一个使用QTimer的方法是为你的对象调用QObject::startTimer()和在你的类中(当然必须继承QObject)重新实现QObject::timerEvent()事件处理器。缺点是timerEvent()不支持像单触发定时器或信号那样的高级水平。

一些操作系统限制可能用到的定时器的数量,Qt会尽力在限制范围内工作。


zmj 2017-07-23 20:31 发表评论

osgviewerQt

$
0
0
#include <QTimer>
#include <QApplication>
#include <QGridLayout>
#include <osgViewer/CompositeViewer>
#include <osgViewer/ViewerEventHandlers>
#include <osgGA/MultiTouchTrackballManipulator>
#include <osgDB/ReadFile>
#include <osgQt/GraphicsWindowQt>
#include <iostream>
class ViewerWidget : public QWidget, public osgViewer::CompositeViewer
{
public:
    ViewerWidget(QWidget* parent = 0, Qt::WindowFlags f = 0, osgViewer::ViewerBase::ThreadingModel threadingModel=osgViewer::CompositeViewer::SingleThreaded) : QWidget(parent, f)
    {
        setThreadingModel(threadingModel);
        // disable the default setting of viewer.done() by pressing Escape.
        setKeyEventSetsDone(0);
        QWidget* widget1 = addViewWidget( createGraphicsWindow(0,0,100,100), osgDB::readNodeFile("cow.osgt") );
        QWidget* widget2 = addViewWidget( createGraphicsWindow(0,0,100,100), osgDB::readNodeFile("glider.osgt") );
        QWidget* widget3 = addViewWidget( createGraphicsWindow(0,0,100,100), osgDB::readNodeFile("axes.osgt") );
        QWidget* widget4 = addViewWidget( createGraphicsWindow(0,0,100,100), osgDB::readNodeFile("fountain.osgt") );
        QWidget* popupWidget = addViewWidget( createGraphicsWindow(900,100,320,240,"Popup window",true), osgDB::readNodeFile("dumptruck.osgt") );
        popupWidget->show();
        QGridLayout* grid = new QGridLayout;
        grid->addWidget( widget1, 0, 0 );
        grid->addWidget( widget2, 0, 1 );
        grid->addWidget( widget3, 1, 0 );
        grid->addWidget( widget4, 1, 1 );
        setLayout( grid );
        connect( &_timer, SIGNAL(timeout()), this, SLOT(update()) );
        _timer.start( 10 );
    }
    QWidget* addViewWidget( osgQt::GraphicsWindowQt* gw, osg::Node* scene )
    {
        osgViewer::View* view = new osgViewer::View;
        addView( view );
        osg::Camera* camera = view->getCamera();
        camera->setGraphicsContext( gw );
        const osg::GraphicsContext::Traits* traits = gw->getTraits();
        camera->setClearColor( osg::Vec4(0.2, 0.2, 0.6, 1.0) );
        camera->setViewport( new osg::Viewport(0, 0, traits->width, traits->height) );
        camera->setProjectionMatrixAsPerspective(30.0f, static_cast<double>(traits->width)/static_cast<double>(traits->height), 1.0f, 10000.0f );
        view->setSceneData( scene );
        view->addEventHandler( new osgViewer::StatsHandler );
        view->setCameraManipulator( new osgGA::MultiTouchTrackballManipulator );
        gw->setTouchEventsEnabled( true );
        return gw->getGLWidget();
    }
    osgQt::GraphicsWindowQt* createGraphicsWindow( int x, int y, int w, int h, const std::string& name="", bool windowDecoration=false )
    {
        osg::DisplaySettings* ds = osg::DisplaySettings::instance().get();
        osg::ref_ptr<osg::GraphicsContext::Traits> traits = new osg::GraphicsContext::Traits;
        traits->windowName = name;
        traits->windowDecoration = windowDecoration;
        traits->x = x;
        traits->y = y;
        traits->width = w;
        traits->height = h;
        traits->doubleBuffer = true;
        traits->alpha = ds->getMinimumNumAlphaBits();
        traits->stencil = ds->getMinimumNumStencilBits();
        traits->sampleBuffers = ds->getMultiSamples();
        traits->samples = ds->getNumMultiSamples();
        return new osgQt::GraphicsWindowQt(traits.get());
    }
    virtual void paintEvent( QPaintEvent* event )
    { frame(); }
protected:
    QTimer _timer;
};
int main( int argc, char** argv )
{
    osg::ArgumentParser arguments(&argc, argv);
#if QT_VERSION >= 0x050000
    // Qt5 is currently crashing and reporting "Cannot make QOpenGLContext current in a different thread" when the viewer is run multi-threaded, this is regression from Qt4
    osgViewer::ViewerBase::ThreadingModel threadingModel = osgViewer::ViewerBase::SingleThreaded;
#else
    osgViewer::ViewerBase::ThreadingModel threadingModel = osgViewer::ViewerBase::CullDrawThreadPerContext;
#endif
    while (arguments.read("--SingleThreaded")) threadingModel = osgViewer::ViewerBase::SingleThreaded;
    while (arguments.read("--CullDrawThreadPerContext")) threadingModel = osgViewer::ViewerBase::CullDrawThreadPerContext;
    while (arguments.read("--DrawThreadPerContext")) threadingModel = osgViewer::ViewerBase::DrawThreadPerContext;
    while (arguments.read("--CullThreadPerCameraDrawThreadPerContext")) threadingModel = osgViewer::ViewerBase::CullThreadPerCameraDrawThreadPerContext;
#if QT_VERSION >= 0x040800
    // Required for multithreaded QGLWidget on Linux/X11, see http://blog.qt.io/blog/2011/06/03/threaded-opengl-in-4-8/
    if (threadingModel != osgViewer::ViewerBase::SingleThreaded)
        QApplication::setAttribute(Qt::AA_X11InitThreads);
#endif
    
    QApplication app(argc, argv);
    ViewerWidget* viewWidget = new ViewerWidget(0, Qt::Widget, threadingModel);
    viewWidget->setGeometry( 100, 100, 800, 600 );
    viewWidget->show();
    return app.exec();
}


zmj 2017-07-23 20:48 发表评论

osgqfont

$
0
0
/* OpenSceneGraph example, osgtext.
*
*  Permission is hereby granted, free of charge, to any person obtaining a copy
*  of this software and associated documentation files (the "Software"), to deal
*  in the Software without restriction, including without limitation the rights
*  to use, copy, modify, merge, publish, distribute, sublicense, and/or sell
*  copies of the Software, and to permit persons to whom the Software is
*  furnished to do so, subject to the following conditions:
*
*  THE SOFTWARE IS PROVIDED "AS IS", WITHOUT WARRANTY OF ANY KIND, EXPRESS OR
*  IMPLIED, INCLUDING BUT NOT LIMITED TO THE WARRANTIES OF MERCHANTABILITY,
*  FITNESS FOR A PARTICULAR PURPOSE AND NONINFRINGEMENT. IN NO EVENT SHALL THE
*  AUTHORS OR COPYRIGHT HOLDERS BE LIABLE FOR ANY CLAIM, DAMAGES OR OTHER
*  LIABILITY, WHETHER IN AN ACTION OF CONTRACT, TORT OR OTHERWISE, ARISING FROM,
*  OUT OF OR IN CONNECTION WITH THE SOFTWARE OR THE USE OR OTHER DEALINGS IN
*  THE SOFTWARE.
*/
#include <QApplication>
#include <QGridLayout>
#include <QWidget>
#include <osgQt/GraphicsWindowQt>
#include <osgQt/QFontImplementation>
#include <osgDB/ReadFile>
#include <osgDB/WriteFile>
#include <osgDB/Registry>
#include <osgGA/StateSetManipulator>
#include <osgGA/TrackballManipulator>
#include <osgViewer/CompositeViewer>
#include <osgViewer/ViewerEventHandlers>
#include <osg/Geode>
#include <osg/Camera>
#include <osg/ShapeDrawable>
#include <osg/Sequence>
#include <osg/PolygonMode>
#include <osgText/Font>
#include <osgText/Text>
osg::Group* createHUDText()
{
    osg::Group* rootNode = new osg::Group;
    osgText::Font* font = new osgText::Font(new osgQt::QFontImplementation(QFont("Arial")));
    osg::Geode* geode  = new osg::Geode;
    rootNode->addChild(geode);
    float windowHeight = 1024.0f;
    float windowWidth = 1280.0f;
    float margin = 50.0f;
////////////////////////////////////////////////////////////////////////////////////////////////////////
//
// Examples of how to set up different text layout
//
    osg::Vec4 layoutColor(1.0f,1.0f,0.0f,1.0f);
    float layoutCharacterSize = 20.0f;
    {
        osgText::Text* text = new osgText::Text;
        text->setFont(font);
        text->setColor(layoutColor);
        text->setCharacterSize(layoutCharacterSize);
        text->setPosition(osg::Vec3(margin,windowHeight-margin,0.0f));
        // the default layout is left to right, typically used in languages
        // originating from europe such as English, French, German, Spanish etc..
        text->setLayout(osgText::Text::LEFT_TO_RIGHT);
        text->setText("text->setLayout(osgText::Text::LEFT_TO_RIGHT);");
        geode->addDrawable(text);
    }
    {
        osgText::Text* text = new osgText::Text;
        text->setFont(font);
        text->setColor(layoutColor);
        text->setCharacterSize(layoutCharacterSize);
        text->setPosition(osg::Vec3(windowWidth-margin,windowHeight-margin,0.0f));
        // right to left layouts would be used for hebrew or arabic fonts.
        text->setLayout(osgText::Text::RIGHT_TO_LEFT);
        text->setAlignment(osgText::Text::RIGHT_BASE_LINE);
        text->setText("text->setLayout(osgText::Text::RIGHT_TO_LEFT);");
        geode->addDrawable(text);
    }
    {
        osgText::Text* text = new osgText::Text;
        text->setFont(font);
        text->setColor(layoutColor);
        text->setPosition(osg::Vec3(margin,windowHeight-margin,0.0f));
        text->setCharacterSize(layoutCharacterSize);
        // vertical font layout would be used for asian fonts.
        text->setLayout(osgText::Text::VERTICAL);
        text->setText("text->setLayout(osgText::Text::VERTICAL);");
        geode->addDrawable(text);
    }
////////////////////////////////////////////////////////////////////////////////////////////////////////
//
// Examples of how to set up different font resolution
//
    osg::Vec4 fontSizeColor(0.0f,1.0f,1.0f,1.0f);
    float fontSizeCharacterSize = 30;
    osg::Vec3 cursor = osg::Vec3(margin*2,windowHeight-margin*2,0.0f);
    {
        osgText::Text* text = new osgText::Text;
        text->setFont(font);
        text->setColor(fontSizeColor);
        text->setCharacterSize(fontSizeCharacterSize);
        text->setPosition(cursor);
        // use text that uses 10 by 10 texels as a target resolution for fonts.
        text->setFontResolution(10,10); // blocky but small texture memory usage
        text->setText("text->setFontResolution(10,10); // blocky but small texture memory usage");
        geode->addDrawable(text);
    }
    cursor.y() -= fontSizeCharacterSize;
    {
        osgText::Text* text = new osgText::Text;
        text->setFont(font);
        text->setColor(fontSizeColor);
        text->setCharacterSize(fontSizeCharacterSize);
        text->setPosition(cursor);
        // use text that uses 20 by 20 texels as a target resolution for fonts.
        text->setFontResolution(20,20); // smoother but higher texture memory usage (but still quite low).
        text->setText("text->setFontResolution(20,20); // smoother but higher texture memory usage (but still quite low).");
        geode->addDrawable(text);
    }
    cursor.y() -= fontSizeCharacterSize;
    {
        osgText::Text* text = new osgText::Text;
        text->setFont(font);
        text->setColor(fontSizeColor);
        text->setCharacterSize(fontSizeCharacterSize);
        text->setPosition(cursor);
        // use text that uses 40 by 40 texels as a target resolution for fonts.
        text->setFontResolution(40,40); // even smoother but again higher texture memory usage.
        text->setText("text->setFontResolution(40,40); // even smoother but again higher texture memory usage.");
        geode->addDrawable(text);
    }
////////////////////////////////////////////////////////////////////////////////////////////////////////
//
// Examples of how to set up different sized text
//
    osg::Vec4 characterSizeColor(1.0f,0.0f,1.0f,1.0f);
    cursor.y() -= fontSizeCharacterSize*2.0f;
    {
        osgText::Text* text = new osgText::Text;
        text->setFont(font);
        text->setColor(characterSizeColor);
        text->setFontResolution(20,20);
        text->setPosition(cursor);
        // use text that is 20 units high.
        text->setCharacterSize(20); // small
        text->setText("text->setCharacterSize(20.0f); // small");
        geode->addDrawable(text);
    }
    cursor.y() -= 30.0f;
    {
        osgText::Text* text = new osgText::Text;
        text->setFont(font);
        text->setColor(characterSizeColor);
        text->setFontResolution(30,30);
        text->setPosition(cursor);
        // use text that is 30 units high.
        text->setCharacterSize(30.0f); // medium
        text->setText("text->setCharacterSize(30.0f); // medium");
        geode->addDrawable(text);
    }
    cursor.y() -= 50.0f;
    {
        osgText::Text* text = new osgText::Text;
        text->setFont(font);
        text->setColor(characterSizeColor);
        text->setFontResolution(40,40);
        text->setPosition(cursor);
        // use text that is 60 units high.
        text->setCharacterSize(60.0f); // large
        text->setText("text->setCharacterSize(60.0f); // large");
        geode->addDrawable(text);
    }
////////////////////////////////////////////////////////////////////////////////////////////////////////
//
// Examples of how to set up different alignments
//
    osg::Vec4 alignmentSizeColor(0.0f,1.0f,0.0f,1.0f);
    float alignmentCharacterSize = 25.0f;
    cursor.x() = 640;
    cursor.y() = margin*4.0f;
    typedef std::pair<osgText::Text::AlignmentType,std::string> AlignmentPair;
    typedef std::vector<AlignmentPair> AlignmentList;
    AlignmentList alignmentList;
    alignmentList.push_back(AlignmentPair(osgText::Text::LEFT_TOP,"text->setAlignment(\nosgText::Text::LEFT_TOP);"));
    alignmentList.push_back(AlignmentPair(osgText::Text::LEFT_CENTER,"text->setAlignment(\nosgText::Text::LEFT_CENTER);"));
    alignmentList.push_back(AlignmentPair(osgText::Text::LEFT_BOTTOM,"text->setAlignment(\nosgText::Text::LEFT_BOTTOM);"));
    alignmentList.push_back(AlignmentPair(osgText::Text::CENTER_TOP,"text->setAlignment(\nosgText::Text::CENTER_TOP);"));
    alignmentList.push_back(AlignmentPair(osgText::Text::CENTER_CENTER,"text->setAlignment(\nosgText::Text::CENTER_CENTER);"));
    alignmentList.push_back(AlignmentPair(osgText::Text::CENTER_BOTTOM,"text->setAlignment(\nosgText::Text::CENTER_BOTTOM);"));
    alignmentList.push_back(AlignmentPair(osgText::Text::RIGHT_TOP,"text->setAlignment(\nosgText::Text::RIGHT_TOP);"));
    alignmentList.push_back(AlignmentPair(osgText::Text::RIGHT_CENTER,"text->setAlignment(\nosgText::Text::RIGHT_CENTER);"));
    alignmentList.push_back(AlignmentPair(osgText::Text::RIGHT_BOTTOM,"text->setAlignment(\nosgText::Text::RIGHT_BOTTOM);"));
    alignmentList.push_back(AlignmentPair(osgText::Text::LEFT_BASE_LINE,"text->setAlignment(\nosgText::Text::LEFT_BASE_LINE);"));
    alignmentList.push_back(AlignmentPair(osgText::Text::CENTER_BASE_LINE,"text->setAlignment(\nosgText::Text::CENTER_BASE_LINE);"));
    alignmentList.push_back(AlignmentPair(osgText::Text::RIGHT_BASE_LINE,"text->setAlignment(\nosgText::Text::RIGHT_BASE_LINE);"));
    alignmentList.push_back(AlignmentPair(osgText::Text::LEFT_BOTTOM_BASE_LINE,"text->setAlignment(\nosgText::Text::LEFT_BOTTOM_BASE_LINE);"));
    alignmentList.push_back(AlignmentPair(osgText::Text::CENTER_BOTTOM_BASE_LINE,"text->setAlignment(\nosgText::Text::CENTER_BOTTOM_BASE_LINE);"));
    alignmentList.push_back(AlignmentPair(osgText::Text::RIGHT_BOTTOM_BASE_LINE,"text->setAlignment(\nosgText::Text::RIGHT_BOTTOM_BASE_LINE);"));
    osg::Sequence* sequence = new osg::Sequence;
    {
        for(AlignmentList::iterator itr=alignmentList.begin();
            itr!=alignmentList.end();
            ++itr)
        {
            osg::Geode* alignmentGeode = new osg::Geode;
            sequence->addChild(alignmentGeode);
            sequence->setTime(sequence->getNumChildren(), 1.0f);
            osgText::Text* text = new osgText::Text;
            text->setFont(font);
            text->setColor(alignmentSizeColor);
            text->setCharacterSize(alignmentCharacterSize);
            text->setPosition(cursor);
            text->setDrawMode(osgText::Text::TEXT|osgText::Text::ALIGNMENT|osgText::Text::BOUNDINGBOX);
            text->setAlignment(itr->first);
            text->setText(itr->second);
            alignmentGeode->addDrawable(text);
        }
    }
    sequence->setMode(osg::Sequence::START);
    sequence->setInterval(osg::Sequence::LOOP, 0, -1);
    sequence->setDuration(1.0f, -1);
    rootNode->addChild(sequence);
////////////////////////////////////////////////////////////////////////////////////////////////////////
//
// Examples of how to set up different fonts...
//
    cursor.x() = margin*2.0f;
    cursor.y() = margin*2.0f;
    osg::Vec4 fontColor(1.0f,0.5f,0.0f,1.0f);
    float fontCharacterSize = 20.0f;
    float spacing = 40.0f;
    {
        osgText::Text* text = new osgText::Text;
        text->setColor(fontColor);
        text->setPosition(cursor);
        text->setCharacterSize(fontCharacterSize);
        text->setFont(0);
        text->setText("text->setFont(0); // inbuilt font.");
        geode->addDrawable(text);
        cursor.x() = text->getBoundingBox().xMax() + spacing ;
    }
    {
        osgText::Font* arial = new osgText::Font(new osgQt::QFontImplementation(QFont("Arial")));
        osgText::Text* text = new osgText::Text;
        text->setColor(fontColor);
        text->setPosition(cursor);
        text->setCharacterSize(fontCharacterSize);
        text->setFont(arial);
        text->setText(arial!=0?
                      "text->setFont(\"fonts/arial.ttf\");":
                      "unable to load \"fonts/arial.ttf\"");
        geode->addDrawable(text);
        cursor.x() = text->getBoundingBox().xMax() + spacing ;
    }
    {
        osgText::Font* times = new osgText::Font(new osgQt::QFontImplementation(QFont("Times")));
        osgText::Text* text = new osgText::Text;
        text->setColor(fontColor);
        text->setPosition(cursor);
        text->setCharacterSize(fontCharacterSize);
        geode->addDrawable(text);
        text->setFont(times);
        text->setText(times!=0?
                      "text->setFont(\"fonts/times.ttf\");":
                      "unable to load \"fonts/times.ttf\"");
        cursor.x() = text->getBoundingBox().xMax() + spacing ;
    }
    cursor.x() = margin*2.0f;
    cursor.y() = margin;
    {
        osgText::Font* dirtydoz = new osgText::Font(new osgQt::QFontImplementation(QFont("Times")));
        osgText::Text* text = new osgText::Text;
        text->setColor(fontColor);
        text->setPosition(cursor);
        text->setCharacterSize(fontCharacterSize);
        text->setFont(dirtydoz);
        text->setText(dirtydoz!=0?
                      "text->setFont(\"fonts/dirtydoz.ttf\");":
                      "unable to load \"fonts/dirtydoz.ttf\"");
        geode->addDrawable(text);
        cursor.x() = text->getBoundingBox().xMax() + spacing ;
    }
    {
        osgText::Font* fudd = new osgText::Font(new osgQt::QFontImplementation(QFont("Times")));
        osgText::Text* text = new osgText::Text;
        text->setColor(fontColor);
        text->setPosition(cursor);
        text->setCharacterSize(fontCharacterSize);
        text->setFont(fudd);
        text->setText(fudd!=0?
                      "text->setFont(\"fonts/fudd.ttf\");":
                      "unable to load \"fonts/fudd.ttf\"");
        geode->addDrawable(text);
        cursor.x() = text->getBoundingBox().xMax() + spacing ;
    }
    return rootNode;
}
// create text which sits in 3D space such as would be inserted into a normal model
osg::Group* create3DText(const osg::Vec3& center,float radius)
{
    osg::Geode* geode  = new osg::Geode;
////////////////////////////////////////////////////////////////////////////////////////////////////////
//
// Examples of how to set up axis/orientation alignments
//
    float characterSize=radius*0.2f;
    osg::Vec3 pos(center.x()-radius*.5f,center.y()-radius*.5f,center.z()-radius*.5f);
    osgText::Text* text1 = new osgText::Text;
    text1->setFont(new osgText::Font(new osgQt::QFontImplementation(QFont("Times"))));
    text1->setCharacterSize(characterSize);
    text1->setPosition(pos);
    text1->setAxisAlignment(osgText::Text::XY_PLANE);
    text1->setText("XY_PLANE");
    geode->addDrawable(text1);
    osgText::Text* text2 = new osgText::Text;
    text2->setFont(new osgText::Font(new osgQt::QFontImplementation(QFont("Times"))));
    text2->setCharacterSize(characterSize);
    text2->setPosition(pos);
    text2->setAxisAlignment(osgText::Text::YZ_PLANE);
    text2->setText("YZ_PLANE");
    geode->addDrawable(text2);
    osgText::Text* text3 = new osgText::Text;
    text3->setFont(new osgText::Font(new osgQt::QFontImplementation(QFont("Times"))));
    text3->setCharacterSize(characterSize);
    text3->setPosition(pos);
    text3->setAxisAlignment(osgText::Text::XZ_PLANE);
    text3->setText("XZ_PLANE");
    geode->addDrawable(text3);
    osgText::Text* text4 = new osgText::Text;
    text4->setFont(new osgText::Font(new osgQt::QFontImplementation(QFont("Times"))));
    text4->setCharacterSize(characterSize);
    text4->setPosition(center);
    text4->setAxisAlignment(osgText::Text::SCREEN);
    osg::Vec4 characterSizeModeColor(1.0f,0.0f,0.5f,1.0f);
    osgText::Text* text5 = new osgText::Text;
    text5->setColor(characterSizeModeColor);
    text5->setFont(new osgText::Font(new osgQt::QFontImplementation(QFont("Times"))));
    //text5->setCharacterSize(characterSize);
    text5->setCharacterSize(32.0f); // medium
    text5->setPosition(center - osg::Vec3(0.0, 0.0, 0.2));
    text5->setAxisAlignment(osgText::Text::SCREEN);
    text5->setCharacterSizeMode(osgText::Text::SCREEN_COORDS);
    text5->setText("CharacterSizeMode SCREEN_COORDS(size 32.0)");
    geode->addDrawable(text5);
    osgText::Text* text6 = new osgText::Text;
    text6->setColor(characterSizeModeColor);
    text6->setFont(new osgText::Font(new osgQt::QFontImplementation(QFont("Times"))));
    text6->setCharacterSize(characterSize);
    text6->setPosition(center - osg::Vec3(0.0, 0.0, 0.4));
    text6->setAxisAlignment(osgText::Text::SCREEN);
    text6->setCharacterSizeMode(osgText::Text::OBJECT_COORDS_WITH_MAXIMUM_SCREEN_SIZE_CAPPED_BY_FONT_HEIGHT);
    text6->setText("CharacterSizeMode OBJECT_COORDS_WITH_MAXIMUM_SCREEN_SIZE_CAPPED_BY_FONT_HEIGHT");
    geode->addDrawable(text6);
    osgText::Text* text7 = new osgText::Text;
    text7->setColor(characterSizeModeColor);
    text7->setFont(new osgText::Font(new osgQt::QFontImplementation(QFont("Times"))));
    text7->setCharacterSize(characterSize);
    text7->setPosition(center - osg::Vec3(0.0, 0.0, 0.6));
    text7->setAxisAlignment(osgText::Text::SCREEN);
    text7->setCharacterSizeMode(osgText::Text::OBJECT_COORDS);
    text7->setText("CharacterSizeMode OBJECT_COORDS (default)");
    geode->addDrawable(text7);
#if 1
    // reproduce outline bounding box compute problem with backdrop on.
    text4->setBackdropType(osgText::Text::OUTLINE);
    text4->setDrawMode(osgText::Text::TEXT | osgText::Text::BOUNDINGBOX);
#endif
    text4->setText("SCREEN");
    geode->addDrawable(text4);
    osg::ShapeDrawable* shape = new osg::ShapeDrawable(new osg::Sphere(center,characterSize*0.2f));
    shape->getOrCreateStateSet()->setMode(GL_LIGHTING,osg::StateAttribute::ON);
    geode->addDrawable(shape);
    osg::Group* rootNode = new osg::Group;
    rootNode->addChild(geode);
    return rootNode;
}
class MainWindow : public QWidget {
public:
    MainWindow()
    {
        osg::ref_ptr<osg::GraphicsContext::Traits> traits = new osg::GraphicsContext::Traits(osg::DisplaySettings::instance().get());
        traits->width = width();
        traits->height = height();
        traits->doubleBuffer = true;
        osgQt::GraphicsWindowQt* graphicsWindow = new osgQt::GraphicsWindowQt(traits.get());
        QGridLayout* grid = new QGridLayout;
        grid->setMargin(0);
        grid->addWidget(graphicsWindow->getGLWidget(), 0, 0);
        setLayout(grid);
        _viewer.setThreadingModel(osgViewer::Viewer::SingleThreaded);
        osg::Camera* camera = _viewer.getCamera();
        camera->setGraphicsContext(graphicsWindow);
        camera->setViewport(new osg::Viewport(0, 0, width(), height()));
        startTimer(10);
    }
    virtual void paintEvent(QPaintEvent* event)
    {
        _viewer.frame();
    }
    virtual void timerEvent(QTimerEvent* event)
    {
        _viewer.frame();
    }
    void setSceneData(osg::Node* node)
    {
        _viewer.setSceneData(node);
    }
    void setCameraManipulator(osgGA::CameraManipulator* manipulator, bool resetPosition = true)
    {
        _viewer.setCameraManipulator(manipulator, resetPosition);
    }
private:
    osgViewer::Viewer _viewer;
};
int main(int argc, char** argv)
{
    QApplication app(argc, argv);
    // prepare scene.
    osg::Vec3 center(0.0f,0.0f,0.0f);
    float radius = 1.0f;
    // create the hud.
    osg::ref_ptr<osg::Camera> camera = new osg::Camera;
    camera->setReferenceFrame(osg::Transform::ABSOLUTE_RF);
    camera->setProjectionMatrixAsOrtho2D(0,1280,0,1024);
    camera->setViewMatrix(osg::Matrix::identity());
    camera->setClearMask(GL_DEPTH_BUFFER_BIT);
    camera->addChild(createHUDText());
    camera->getOrCreateStateSet()->setMode(GL_LIGHTING,osg::StateAttribute::OFF);
    // make sure the root node is group so we can add extra nodes to it.
    osg::ref_ptr<osg::Group> group = new osg::Group;
    group->addChild(camera.get());
    group->addChild(create3DText(center, radius));
    // The qt window
    MainWindow widget;
    // set the scene to render
    widget.setSceneData(group.get());
    widget.setCameraManipulator(new osgGA::TrackballManipulator);
    widget.setGeometry(100, 100, 800, 600);
    widget.show();
    return app.exec();
}


zmj 2017-07-23 20:48 发表评论

Chapter 8: Animating Scene Objects

$
0
0
     摘要: https://github.com/mylxiaoyi/osg3/blob/master/source/ch08.rstOSG提供了一系列的工具集支持实时动画的实现,包括变换动画,关键帧动画,骨骼动画以及几乎所有我们可以在本章中发现的其他动画。在本章中我们将会首先解释场景对象动画的基本概念,然后介绍大多数常用场景动画类型的实现细节,从而可以应用到各种场景。在本章中我们将会讨论:回调的概念并使用回...  阅读全文

zmj 2017-08-02 10:54 发表评论

[总结]FFMPEG视音频编解码零基础学习方法

$
0
0
     摘要: http://blog.csdn.net/leixiaohua1020/article/details/15811977在CSDN上的这一段日子,接触到了很多同行业的人,尤其是使用FFMPEG进行视音频编解码的人,有的已经是有多年经验的“大神”,有的是刚开始学习的初学者。在和大家探讨的过程中,我忽然发现了一个问题:在“大神”和初学者之间好像有一个不可...  阅读全文

zmj 2017-08-10 22:03 发表评论

Qt Quick 之 QML 与 C++ 混合编程详解

$
0
0
     摘要: http://blog.csdn.net/foruok/article/details/32698603版权声明:本文为foruok原创文章,转载请通过订阅号“程序视界”联系foruok获取授权。目录(?)[+]    Qt Quick 技术的引入,使得你能够快速构建 UI ,具有动画、各种绚丽效果的 UI 都不在话下。但它不是万能的,也有很多局限性,原...  阅读全文

zmj 2017-08-21 13:23 发表评论

Ball Tracking / Detection using OpenCV

$
0
0
https://anikettatipamula.blogspot.jp/2012/12/ball-tracking-detection-using-opencv.html

Ball Tracking / Detection using OpenCV

   Ball detection is pretty easy on OpenCV. So to start with lets describe what steps we will go through.

                       LINK TO THE CODE


1.Load an image / start a video capture


2.Convert image from RGB space to HSV space . HSV(hue saturation value) space gives us better results while doing color based segmentation.
3.Seperate Image into its 3 component images(i.e H  S  V each of which is a one dimensional image or intensity image)
H component
S component

V component

4.Use a condition for intensity values in the image and get a Binary image.
  i.e let say we taken H intensity image .If our ball is red color .Then in this image we will find that the values of the pixel where the ball is present , lies in a specific range. so we define a condition for every pixel . if                                (pixel > threshold_min & pixel  )= pixel of o/p image is 1 else it is zero.

NOTE:
FOR THE PURPOSE OF CALIBRATION WE HAVE 2 SLIDERS ON EACH COMPONENT IMAGE TO SET THE LOWER AND UPPER LIMIT OF PIXEL VALUES.

H component after condition


We do this for all components i.e for S and V.


S component after condition
V component after condition
5.Now we have three binary images( only black and only white) . Which has the region of ball as 1's and every thigh else which has the intensity values greater(less) than threshold .The pixels that do not pass this conditions will be zero.


6.We then combine all the above three Binary images (i.e we AND them all). All the pixels that are white in the three images will be white in the output of this step.So there will be regions too which will have 1's but with lower areas and of random shapes.
Combined image
7.Now we use houghs transform on the output of last operation to find the regions which are circular in shape.

8.Then we draw the marker on the detected circles as well as display the center and radius of the circles


zmj 2017-08-29 09:19 发表评论

Detect red circles in an image using OpenCV

$
0
0
https://solarianprogrammer.com/2015/05/08/detect-red-circles-image-using-opencv/

The code for this post is on GitHub: https://github.com/sol-prog/OpenCV-red-circle-detection.

A few days ago someone asked me, in an email, if it is possible to detect all red circles in an image that contains circles and rectangles of various colors. I thought this problem could be of certain interest to the readers of this blog, hence the present article.

From the many possible approaches to the problem of red circles detection, two seem straightforward:

  • Detect all circles from the input image and keep only the ones that are filled with red.
  • Threshold the input image in order to keep only the red pixels, search for circles in the result.

I found the second approach to be slightly better than the first one (less false positives), so I am going to present it in this post.

I will use the OpenCV library and C++, but you can easily follow along with any of the other OpenCV bindings (C, Python, Java).

Lets start by thresholding the input image for anything that is not red. Instead of the usual RGB color space we are going to use the HSV space, which has the desirable property that allows us to identify a particular color using a single value, the hue, instead of three values. As a side note, in OpenCV H has values from 0 to 180, S and V from 0 to 255. The red color, in OpenCV, has the hue values approximately in the range of 0 to 10 and 160 to 180.

Next piece of code converts a color image from BGR (internally, OpenCV stores a color image in the BGR format rather than RGB) to HSV and thresholds the HSV image for anything that is not red:

 1 	...  2 	// Convert input image to HSV  3 	cv::Mat hsv_image;  4 	cv::cvtColor(bgr_image, hsv_image, cv::COLOR_BGR2HSV);  5   6 	// Threshold the HSV image, keep only the red pixels  7 	cv::Mat lower_red_hue_range;  8 	cv::Mat upper_red_hue_range;  9 	cv::inRange(hsv_image, cv::Scalar(0, 100, 100), cv::Scalar(10, 255, 255), lower_red_hue_range); 10 	cv::inRange(hsv_image, cv::Scalar(160, 100, 100), cv::Scalar(179, 255, 255), upper_red_hue_range); 11 	... 

Take the next input image as an example:

Five colored circles

if we use the above piece of code, this is what we get:

Lower red hue range

Upper red hue range

As you can see, the first threshold image captured the big red circle from the input image, while the second threshold image has captured the smaller red circle. Typically, you won’t see such a clear separation between the two red ranges. I’ve slightly cheated when I filled the circles in GIMP and used hue values from both intervals, in order to show you that a similar situation can arrive in practice.

Next step is to combine the above threshold images and slightly blur the result, in order to avoid false positives:

1 	... 2 	// Combine the above two images 3 	cv::Mat red_hue_image; 4 	cv::addWeighted(lower_red_hue_range, 1.0, upper_red_hue_range, 1.0, 0.0, red_hue_image); 5  6 	cv::GaussianBlur(red_hue_image, red_hue_image, cv::Size(9, 9), 2, 2); 7 	... 

Combined red hue range

Once we have the threshold image that contains only the red pixels from the original image, we can use the circle Hough Transform to detect the circles. In OpenCV this is implemented as HoughCircles:

1 	... 2 	// Use the Hough transform to detect circles in the combined threshold image 3 	std::vector<cv::Vec3f> circles; 4 	cv::HoughCircles(red_hue_image, circles, CV_HOUGH_GRADIENT, 1, red_hue_image.rows/8, 100, 20, 0, 0); 5 	... 

As a side note, parameters 6 and 7 from the HoughCircles must be usually tuned from case to case in order to detect circles. All found circles are stored in the circles vector from the above piece of code, using this information we can outline the detected circles on the original image:

1 	// Loop over all detected circles and outline them on the original image 2 	if(circles.size() == 0) std::exit(-1); 3 	for(size_t current_circle = 0; current_circle < circles.size(); ++current_circle) { 4 		cv::Point center(std::round(circles[current_circle][0]), std::round(circles[current_circle][1])); 5 		int radius = std::round(circles[current_circle][2]); 6  7 		cv::circle(orig_image, center, radius, cv::Scalar(0, 255, 0), 5); 8 	} 

Outline of the detected circles

Lets try the code on a slightly more complex image:

Circles and rectangles input image

and the result:

Circles and rectangles detected red circles

Adding some noise to the same input image as above:

Circles and rectangles input image with noise

and the incredible result:

Circles and rectangles with noise detected red circles

Ouch! Apparently the noise from the input image fooled the Hough detector and now we have more circles than we’ve expected. A simple cure is to filter the input image before the BGR to HSV conversion, for this kind of noise usually a median filter works best:

1 	... 2 	cv::medianBlur(bgr_image, bgr_image, 3); 3  4 	// Convert input image to HSV 5 	cv::Mat hsv_image; 6 	cv::cvtColor(bgr_image, hsv_image, cv::COLOR_BGR2HSV); 7 	... 

and now the result is much improved:

Circles and rectangles with noise median filter detected red circles


zmj 2017-08-29 10:52 发表评论

OpenCV模板匹配算法详解

$
0
0

http://www.cnblogs.com/zhaoweiwei/p/OpenVC_matchTemplate.html

1 理论介绍

模板匹配是在一幅图像中寻找一个特定目标的方法之一,这种方法的原理非常简单,遍历图像中的每一个可能的位置,比较各处与模板是否“相似”,当相似度足够高时,就认为找到了我们的目标。OpenCV提供了6种模板匹配算法:

  1. 平方差匹配法CV_TM_SQDIFF
  2. 归一化平方差匹配法CV_TM_SQDIFF_NORMED
  3. 相关匹配法CV_TM_CCORR
  4. 归一化相关匹配法CV_TM_CCORR_NORMED
  5. 相关系数匹配法CV_TM_CCOEFF
  6. 归一化相关系数匹配法CV_TM_CCOEFF_NORMED

用T表示模板图像,I表示待匹配图像,切模板图像的宽为w高为h,用R表示匹配结果,匹配过程如下图所示:

上述6中匹配方法可用以下公式进行描述:

2 示例代码

下面给出方法6的python代码

 归一化相关系数匹配法

代码58行中的N就是公式(6)中的w*h,由于python代码运行速度比较慢,代码的58、59行相当于对公式(6)的分子分母都进行了平方操作,并且分子分母都乘以了N方,以减小计算量,所以代码61行的ret相当于公式(6)中的R(x,y)的平方,

为了更快的进行算法验证,用上述代码进行验证时请尽量选用较小的匹配图像及模板图像,下图显示了我的匹配结果(待匹配图像295x184模板69x46用了十几分钟):

3 OpenCV源码

较新版本的OpenCV库中的模板匹配已经进行了较多的算法改进,直接看新版本中的算法需要了解很多相关理论知识,所以我们结合OpenCV0.9.5的源码进行讲解,该版本的源码基本上是C风格代码更容易进行理解(如果要对

OpenCV源码进行研究,建议用该版本进行入门),仍以归一化相关系数匹配法为例进行分析。

复制代码
  1 /*   2 * pImage: 待匹配图像   3 * image: 待匹配图像宽(width*depth并已4字节对齐)   4 * roiSize: 待匹配图像尺寸   5 * pTemplate: 模板图像   6 * templStep: 模板图像宽   7 * templSize: 模板图像尺寸   8 * pResult: 匹配结果   9 * resultStep: 匹配结果宽  10 * pBuffer: 中间结果数据缓存  11 */  12 IPCVAPI_IMPL( CvStatus, icvMatchTemplate_CoeffNormed_32f_C1R,  13               (const float *pImage, int imageStep, CvSize roiSize,  14                const float *pTemplate, int templStep, CvSize templSize,  15                float *pResult, int resultStep, void *pBuffer) )  16 {  17     float *imgBuf = 0;              // 待匹配图像相关数据  18     float *templBuf = 0;            // 模板图像数据  19     double *sumBuf = 0;             // 待匹配图像遍历块单行和  20     double *sqsumBuf = 0;           // 待匹配图像遍历块单行平方和  21     double *resNum = 0;             // 模板图像和待匹配图像遍历块内积  22     double *resDenom = 0;           // 待匹配图像遍历块累加和及待匹配图像遍历块平方累加和  23     double templCoeff = 0;          // 模板图像均分差倒数  24     double templSum = 0;            // 模板图像累加和  25   26     int winLen = templSize.width * templSize.height;  27     double winCoeff = 1. / (winLen + DBL_EPSILON);          // + DBL_EPSILON 加一个小整数防止分母为零  28   29     CvSize resultSize = cvSize( roiSize.width - templSize.width + 1,  30                                 roiSize.height - templSize.height + 1 );  31     int x, y;  32   33     // 计算并为imgBuf、templBuf、sumBuf、sqsumBuf、resNum、resDenom分配存储空间  34     CvStatus result = icvMatchTemplateEntry( pImage, imageStep, roiSize,  35                                              pTemplate, templStep, templSize,  36                                              pResult, resultStep, pBuffer,  37                                              cv32f, 1, 1,  38                                              (void **) &imgBuf, (void **) &templBuf,  39                                              (void **) &sumBuf, (void **) &sqsumBuf,  40                                              (void **) &resNum, (void **) &resDenom );  41   42     if( result != CV_OK )  43         return result;  44   45     imageStep /= sizeof_float;  46     templStep /= sizeof_float;  47     resultStep /= sizeof_float;  48   49     /* calc common statistics for template and image */  50     {  51         const float *rowPtr = (const float *) imgBuf;  52         double templSqsum = icvCrossCorr_32f_C1( templBuf, templBuf, winLen );          // 模板图像平方累加和  53   54         templSum = icvSumPixels_32f_C1( templBuf, winLen );                             // 模板图像累加和  55         templCoeff = (double) templSqsum - ((double) templSum) * templSum * winCoeff;   // 模板图像均方差的平方  56         templCoeff = icvInvSqrt64d( fabs( templCoeff ) + FLT_EPSILON );                 // 模板图像均方差倒数  57   58         for( y = 0; y < roiSize.height; y++, rowPtr += templSize.width )  59         {  60             sumBuf[y] = icvSumPixels_32f_C1( rowPtr, templSize.width );                 // 待匹配图像按模板图像宽度求每行之和(遍历位置第一列)  61             sqsumBuf[y] = icvCrossCorr_32f_C1( rowPtr, rowPtr, templSize.width );       // 待匹配图像按模板图像宽度求每行平方之和(遍历位置第一列)  62         }  63     }  64   65     /* main loop - through x coordinate of the result */  66     for( x = 0; x < resultSize.width; x++ )  67     {  68         double sum = 0;  69         double sqsum = 0;  70         float *imgPtr = imgBuf + x;                                                      // 待匹配图像起始位置  71   72         /* update sums and image band buffer */                                          // 如果不是第1列需重新更新sumBuf,更新后sumBuf为遍历位置第x列每行之和(行宽为模板图像宽)  73         if( x > 0 )  74         {  75             const float *src = pImage + x + templSize.width - 1;  76             float *dst = imgPtr - 1;  77             float out_val = dst[0];  78   79             dst += templSize.width;  80   81             for( y = 0; y < roiSize.height; y++, src += imageStep, dst += templSize.width )  82             {  83                 float in_val = src[0];  84   85                 sumBuf[y] += in_val - out_val;  86                 sqsumBuf[y] += (in_val - out_val) * (in_val + out_val);  87                 out_val = dst[0];  88                 dst[0] = (float) in_val;  89             }  90         }  91   92         for( y = 0; y < templSize.height; y++ )                                          // 求遍历位置第x列,第1行处遍历块累加和sum及平方累加和sqsum  93         {  94             sum += sumBuf[y];  95             sqsum += sqsumBuf[y];  96         }  97   98         for( y = 0; y < resultSize.height; y++, imgPtr += templSize.width )  99         { 100             double res = icvCrossCorr_32f_C1( imgPtr, templBuf, winLen );               // 求模板图像和待匹配图像y行x列处遍历块的内积 101  102             if( y > 0 )                                                                 // 如果不是第1行需更新遍历块累加和sum及平方累加和sqsum 103             { 104                 sum -= sumBuf[y - 1]; 105                 sum += sumBuf[y + templSize.height - 1]; 106                 sqsum -= sqsumBuf[y - 1]; 107                 sqsum += sqsumBuf[y + templSize.height - 1]; 108             } 109             resNum[y] = res; 110             resDenom[y] = sum; 111             resDenom[y + resultSize.height] = sqsum; 112         } 113  114         for( y = 0; y < resultSize.height; y++ ) 115         { 116             double sum = ((double) resDenom[y]); 117             double wsum = winCoeff * sum; 118             double res = ((double) resNum[y]) - wsum * templSum; 119             double nrm_s = ((double) resDenom[y + resultSize.height]) - wsum * sum; 120  121             res *= templCoeff * icvInvSqrt64d( fabs( nrm_s ) + FLT_EPSILON ); 122             pResult[x + y * resultStep] = (float) res; 123         } 124     } 125  126     return CV_OK; 127 }
复制代码

以上代码是归一化相关系数法核心函数icvMatchTemplate_CoeffNormed_32f_C1R的源码,我已经在源码中进行了详细的注释,读者需自己再进行理解,需要进一步说明的是:

代码118行res就是计算公式(6)的分子部分,代码56行templCoeff就是计算公式(6)分母的左半部分,代码121行icvInvSqrt64d函数就是在计算公式(6)分母的右半部分,该行res的最终结果正是公式(6)中的R(x,y)。

4 结束语

OpenCV0.9.5源码下载:http://download.csdn.net/detail/weiwei22844/9547820

参考文章:http://blog.sina.com.cn/s/blog_4ae371970101aejw.html

              http://blog.csdn.net/liyuanbhu/article/details/49837661

分类: 计算视觉


zmj 2017-08-30 17:36 发表评论

【OpenCV入门教程之十四】OpenCV霍夫变换:霍夫线变换,霍夫圆变换合辑

$
0
0
     摘要: http://blog.csdn.net/poem_qianmo/article/details/26977557本系列文章由@浅墨_毛星云 出品,转载请注明出处。   文章链接: http://blog.csdn.net/poem_qianmo/article/details/26977557 作者:毛星云(浅墨)    微博:http...  阅读全文

zmj 2017-09-07 14:14 发表评论

opencv3寻找最小包围圆形-minEnclosingCircle函数

$
0
0
http://blog.csdn.net/qq_23880193/article/details/49257637

版权声明:本文为博主原创文章,未经博主允许不得转载。

  1. #include<iostream>  
  2. #include<vector>  
  3. #include<opencv2/opencv.hpp>  
  4.   
  5. using namespace cv;  
  6. using namespace std;  
  7.   
  8. int main()  
  9. {  
  10.     Mat srcImage(Size(600, 600), CV_8UC3, Scalar(0));  
  11.   
  12.     RNG &rng = theRNG();  
  13.   
  14.     char key;  
  15.     while (1)  
  16.     {  
  17.         //随机生成一些点  
  18.         //首先就是随机生成点的总数量  
  19.         int g_nPointCount = rng.uniform(3, 30);  
  20.         //接下来就是随机生成一些点的坐标  
  21.         vector<Point> points;  
  22.         for (int i = 0; i < g_nPointCount; i++)  
  23.         {  
  24.             Point midPoint;  
  25.   
  26.             midPoint.x = rng.uniform(srcImage.cols / 4, srcImage.cols * 3 / 4);  
  27.             midPoint.y = rng.uniform(srcImage.rows / 4, srcImage.rows * 3 / 4);  
  28.   
  29.             points.push_back(midPoint);  
  30.         }  
  31.   
  32.         //显示刚刚随机生成的那些点  
  33.         for (int i = 0; i < g_nPointCount; i++)  
  34.         {  
  35.             circle(srcImage, points[i], 0, Scalar(rng.uniform(0, 255), rng.uniform(0, 255), rng.uniform(0, 255)), 3);  
  36.         }  
  37.   
  38.         //在生成的那些随机点中寻找最小包围圆形  
  39.         Point2f center;  
  40.         float radius;  
  41.         minEnclosingCircle(points, center, radius);  
  42.   
  43.         //根据得到的圆形和半径  绘制圆形  
  44.         circle(srcImage, static_cast<Point>(center), (int)radius  
  45.             , Scalar(rng.uniform(0, 255), rng.uniform(0, 255), rng.uniform(0, 255)), 3);  
  46.   
  47.         imshow("【绘制结束后的图像】", srcImage);  
  48.   
  49.         key = waitKey();  
  50.         if (key == 27)  
  51.             break;  
  52.         else  
  53.             srcImage = Scalar::all(0);  
  54.     }  
  55.   
  56.     return 0;  
  57. }  


zmj 2017-09-14 16:05 发表评论

USING OPENCV FOR SIMPLE OBJECT DETECTION

$
0
0
     摘要: https://solderspot.wordpress.com/2014/10/18/using-opencv-for-simple-object-detection/My current project is to build a bot for the “Blue Block Challenge”. The goal is to create an autonomou...  阅读全文

zmj 2017-09-14 16:07 发表评论

Shape Detection & Tracking using Contours

$
0
0
     摘要: https://opencv-srf.blogspot.jp/2011/09/object-detection-tracking-using-contours.htmlIn the previous tutorial, we could detect and track an object using color separation. But we could not ide...  阅读全文

zmj 2017-09-14 16:44 发表评论

Throwing a football, Part II

$
0
0
https://www.wired.com/2008/12/throwing-a-football-part-ii/

IN PART I of this post, I talked about the basics of projectile motion with no air resistance. Also in that post, I showed that (without air resistance) the angle to throw a ball for maximum range is 45 degrees. When throwing a football, there is some air resistance this means that 45 degree is not necessarily the angle for the greatest range. Well, can’t I just do the same thing as before? It turns out that it is a significantly different problem when air resistance is added. Without air resistance, the acceleration was constant. Not so now, my friend.

The problem is that air resistance depends on the velocity of the object. Search your feelings, you know this to be true. When you are driving (or riding) in a car and you stick your hand out the window, you can feel the air pushing against your hand. The faster the car moves, the greater this force. The air resistance force depends on:

  • Velocity of the object. The typical model used for objects like a football would depend on the direction and the square of the magnitude of the velocity.
  • The density of air.
  • The cross sectional area of the object. Compare putting an open hand out the car window to a closed fist out the car window.
  • Some air drag coefficient. Imagine a cone and a flat disk, both with the same radius (and thus same cross sectional area). These two objects would have different air resistances due to the shape, this is the coefficient of drag (also called other things I am sure).

So, since the air force depends on the velocity, it will not be a constant acceleration. Kinematic equations won’t really work. To easily solve this problem, I will use numerical methods. The basic idea in numerical calculations is to break the problem into a whole bunch of little steps. During these small steps, the velocity does not change much so that I can “pretend” like the acceleration is constant. Here is a diagram of the forces on the ball while in the air.

air-resistance-diagram-1

Before I go any further, I would like to say that there has been some “stuff” done on throwing a football before – and they probably do a better job than this post. Here are a few references (especially with more detailed discussion about the coefficient of drag for a spinning football):

And now for some assumptions:

  • I hereby assume that the air resistance is proportional to the square of the magnitude of the velocity of the object.
  • The orientation of the football is such that the coefficient of drag is constant. This may not actually be true. Imagine if the ball were thrown and spinning with the axis parallel to the ground. If the axis stayed parallel to the ground, for part of the motion the direction of motion would not be along the axis. Get it?
  • Ignore aerodynamic lift effects.
  • Mass of the ball is .42 kg.
  • The density of air is 1.2 kg/m3.
  • The coefficient of drag for the football is 0.05 to 0.14
  • Typical initial speed of a thrown football is around 20 m/s.

And finally, here is the recipie for my numerical calculation (in vpython of course):

  • Set up initial conditions
  • Set the angle of the throw
  • Calculate the new position assuming a constant velocity.
  • Calculate the new momentum (and thus velocity) assuming a constant force.
  • Calculate the force (it changes when the velocity changes)
  • Increase the time.
  • Keep doing the above until the ball gets back to y=0 m.
  • Change the angle and do all the above again.

The answer

First, I ran the program with an initial velocity of 20 m/s. Here is the data:

rangeplot2

At 35 degrees, this gives a distance of 23 meters (25 yards). This doesn’t seem right. I know a quarterback can throw farther than that. What if I change the coefficient to 0.05? Then the greatest angle is closer to 40 degrees and it goes 28 meters. Still seems low (think Doug Flutie). What about with no air resistance? Then it goes 41 meters (at 45 degrees). So, here is the Doug Flutie throw.

From the video, it looks like he threw the ball from the 36ish yard line to about the 2 yard line. This would be 62 yards (56.7 meters). I am going to assume a coefficient of 0.07 (randomly). So, what initial speed will get this far? If I put in an initial velocity of 33 m/s, the ball will go 55.7 meters at an angle of 35 degrees.

Really the thing that amazes me is that someone (not me) can throw a ball that far and essentially get it where they want it. Even if they are only sometimes successful, it is still amazing. How is it that humans can throw things somewhat accurately? We obviously do not do projectile motion calculations in our head – or maybe we do?

Go Back to Top. Skip To: Start of Article.

zmj 2017-09-24 13:32 发表评论

Explained: How does a soccer ball swerve?

$
0
0
https://news.mit.edu/2014/explained-how-does-soccer-ball-swerve-0617

The smoothness of a ball’s surface — in addition to playing technique — is a critical factor.

It happens every four years: The World Cup begins and some of the world’s most skilled players carefully line up free kicks, take aim — and shoot way over the goal.

The players are all trying to bend the ball into a top corner of the goal, often over a wall of defensive players and away from the reach of a lunging goalkeeper. Yet when such shots go awry in the World Cup, a blame game usually sets in. Players, fans, and pundits all suggest that the new official tournament ball, introduced every four years, is the cause.

Many of the people saying that may be seeking excuses. And yet scholars do think that subtle variations among soccer balls affect how they fly. Specifically, researchers increasingly believe that one variable really does differentiate soccer balls: their surfaces. It is harder to control a smoother ball, such as the much-discussed “Jabulani” used at the 2010 World Cup. The new ball used at this year’s tournament in Brazil, the “Brazuca,” has seams that are over 50 percent longer, one factor that makes the ball less smooth and apparently more predictable in flight.

“The details of the flow of air around the ball are complicated, and in particular they depend on how rough the ball is,” says John Bush, a professor of applied mathematics at MIT and the author of a recently published article about the aerodynamics of soccer balls. “If the ball is perfectly smooth, it bends the wrong way.”

By the “wrong way,” Bush means that two otherwise similar balls struck precisely the same way, by the same player, can actually curve in opposite directions, depending on the surface of those balls. Sound surprising?

Magnus, meet Messi

It may, because the question of how a spinning ball curves in flight would seem to have a textbook answer: the Magnus Effect. This phenomenon was first described by Isaac Newton, who noticed that in tennis, topspin causes a ball to dip, while backspin flattens out its trajectory. A curveball in baseball is another example from sports: A pitcher throws the ball with especially tight topspin, or sidespin rotation, and the ball curves in the direction of the spin.

In soccer, the same thing usually occurs with free kicks, corner kicks, crosses from the wings, and other kinds of passes or shots: The player kicking the ball applies spin during contact, creating rotation that makes the ball curve. For a right-footed player, the “natural” technique is to brush toward the outside of the ball, creating a shot or pass with a right-to-left hook; a left-footed player’s “natural” shot will curl left-to-right.

So far, so intuitive: Soccer fans can probably conjure the image of stars like Lionel Messi, Andrea Pirlo, or Marta, a superstar of women’s soccer, doing this. But this kind of shot — the Brazilians call it the “chute de curva” — depends on a ball with some surface roughness. Without that, this classic piece of the soccer player’s arsenal goes away, as Bush points out in his article, “The Aerodynamics of the Beautiful Game,” from the volume “Sports Physics,” published by Les Editions de L’Ecole Polytechnique in France.

“The fact is that the Magnus Effect can change sign,” Bush says. “People don’t generally appreciate that fact.” Given an absolutely smooth ball, the direction of the curve may reverse: The same kicking motion will not produce a shot or pass curving in a right-to-left direction, but in a left-to-right direction.


In the above animation, a player strikes two balls: one smooth, and one with an elastic band wrapped around its equator. Both balls are struck with his instep so as to impart a counterclockwise spin. However, the smooth ball bends in the opposite direction as the banded ball. The presence of the elastic band changes the boundary layer on the ball surface from “laminar" to “turbulent." This is why all soccer balls have some surface roughness; otherwise, they would bend in the opposite direction as the ball's initial rotation. (Courtesy of the researchers.)

Why is this? Bush says it is due to the way the surface of the ball creates motion at the “boundary layer” between the spinning ball and the air. The rougher the ball, the easier it is to create the textbook version of the Magnus Effect, with a “positive” sign: The ball curves in the expected direction.

“The boundary layer can be laminar, which is smoothly flowing, or turbulent, in which case you have eddies,” Bush says. “The boundary layer is changing from laminar to turbulent at different spots according to how quickly the ball is spinning. Where that transition arises is influenced by the surface roughness, the stitching of the ball. If you change the patterning of the panels, the transition points move, and the pressure distribution changes.” The Magnus Effect can then have a “negative” sign.

From Brazil: The “dove without wings”

If the reversing of the Magnus Effect has largely eluded detection, of course, that is because soccer balls are not absolutely smooth — but they have been moving in that direction over the decades. While other sports, such as baseball and cricket, have strict rules about the stitching on the ball, soccer does not, and advances in technology have largely given balls sleeker, smoother designs — until the introduction of the Brazuca, at least.

There is actually a bit more to the story, however, since sometimes players will strike balls so as to give them very little spin — the equivalent of a knuckleball in baseball. In this case, the ball flutters unpredictably from side to side. Brazilians have a name for this: the “pombo sem asa,” or “dove without wings.”

In this case, Bush says, “The peculiar motion of a fluttering free kick arises because the points of boundary-layer transition are different on opposite sides of the ball.” Because the ball has no initial spin, the motion of the surrounding air has more of an effect on the ball’s flight: “A ball that’s knuckling … is moving in response to the pressure distribution, which is constantly changing.” Indeed, a free kick Pirlo took in Italy’s match against England on Saturday, which fooled the goalkeeper but hit the crossbar, demonstrated this kind of action.

Bush’s own interest in the subject arises from being a lifelong soccer player and fan — the kind who, sitting in his office, will summon up clips of the best free-kick takers he’s seen. These include Juninho Pernambucano, a Brazilian midfielder who played at the 2006 World Cup, and Sinisa Mihajlovic, a Serbian defender of the 1990s.

And Bush happily plays a clip of Brazilian fullback Roberto Carlos’ famous free kick from a 1997 match against France, where the player used the outside of his left foot — but deployed the “positive” Magnus Effect — to score on an outrageously bending free kick.  

“That was by far the best free kick ever taken,” Bush says. Putting on his professor’s hat for a moment, he adds: “I think it’s important to encourage people to try to understand everything. Even in the most commonplace things, there is subtle and interesting physics.”


zmj 2017-10-10 17:32 发表评论

Blob Detection Using OpenCV ( Python, C++ )

$
0
0
     摘要: https://www.learnopencv.com/blob-detection-using-opencv-python-c/FEBRUARY 17, 2015 BY SATYA MALLICKThis tutorial explains simple blob detection using OpenCV.What is a Blob ?A Blob is a group...  阅读全文

zmj 2017-10-11 15:20 发表评论

Geometric Transformations of Images

$
0
0
https://docs.opencv.org/3.0-beta/doc/py_tutorials/py_imgproc/py_geometric_transformations/py_geometric_transformations.html

Goals

  • Learn to apply different geometric transformation to images like translation, rotation, affine transformation etc.
  • You will see these functions: cv2.getPerspectiveTransform

Transformations

OpenCV provides two transformation functions, cv2.warpAffine and cv2.warpPerspective, with which you can have all kinds of transformations. cv2.warpAffine takes a 2x3 transformation matrix while cv2.warpPerspective takes a 3x3 transformation matrix as input.

Scaling

Scaling is just resizing of the image. OpenCV comes with a function cv2.resize() for this purpose. The size of the image can be specified manually, or you can specify the scaling factor. Different interpolation methods are used. Preferable interpolation methods are cv2.INTER_AREA for shrinking and cv2.INTER_CUBIC (slow) & cv2.INTER_LINEAR for zooming. By default, interpolation method used is cv2.INTER_LINEAR for all resizing purposes. You can resize an input image either of following methods:

import cv2 import numpy as np  img = cv2.imread('messi5.jpg')  res = cv2.resize(img,None,fx=2, fy=2, interpolation = cv2.INTER_CUBIC)  #OR  height, width = img.shape[:2] res = cv2.resize(img,(2*width, 2*height), interpolation = cv2.INTER_CUBIC) 

Translation

Translation is the shifting of object’s location. If you know the shift in (x,y) direction, let it be (t_x,t_y)
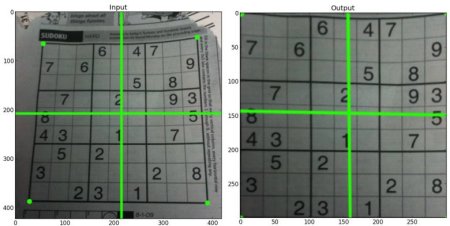
, you can create the transformation matrix \textbf{M} as follows:

M = \begin{bmatrix} 1 & 0 & t_x \\ 0 & 1 & t_y  \end{bmatrix}

You can take make it into a Numpy array of type np.float32 and pass it into cv2.warpAffine() function. See below example for a shift of (100,50):

import cv2 import numpy as np  img = cv2.imread('messi5.jpg',0) rows,cols = img.shape  M = np.float32([[1,0,100],[0,1,50]]) dst = cv2.warpAffine(img,M,(cols,rows))  cv2.imshow('img',dst) cv2.waitKey(0) cv2.destroyAllWindows() 

Warning


Third argument of the cv2.warpAffine() function is the size of the output image, which should be in the form of (width, height). Remember width = number of columns, and height = number of rows.

See the result below:

Translation

Rotation

Rotation of an image for an angle \theta 
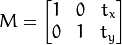
is achieved by the transformation matrix of the form

M = \begin{bmatrix} cos\theta & -sin\theta \\ sin\theta & cos\theta   \end{bmatrix}

But OpenCV provides scaled rotation with adjustable center of rotation so that you can rotate at any location you prefer. Modified transformation matrix is given by

\begin{bmatrix} \alpha &  \beta & (1- \alpha )  \cdot center.x -  \beta \cdot center.y \\ - \beta &  \alpha &  \beta \cdot center.x + (1- \alpha )  \cdot center.y \end{bmatrix}

where:

\begin{array}{l} \alpha =  scale \cdot \cos \theta , \\ \beta =  scale \cdot \sin \theta \end{array}

To find this transformation matrix, OpenCV provides a function, cv2.getRotationMatrix2D. Check below example which rotates the image by 90 degree with respect to center without any scaling.

img = cv2.imread('messi5.jpg',0) rows,cols = img.shape  M = cv2.getRotationMatrix2D((cols/2,rows/2),90,1) dst = cv2.warpAffine(img,M,(cols,rows)) 

See the result:

Rotation of Image

Affine Transformation

In affine transformation, all parallel lines in the original image will still be parallel in the output image. To find the transformation matrix, we need three points from input image and their corresponding locations in output image. Then cv2.getAffineTransform will create a 2x3 matrix which is to be passed to cv2.warpAffine.

Check below example, and also look at the points I selected (which are marked in Green color):

img = cv2.imread('drawing.png') rows,cols,ch = img.shape  pts1 = np.float32([[50,50],[200,50],[50,200]]) pts2 = np.float32([[10,100],[200,50],[100,250]])  M = cv2.getAffineTransform(pts1,pts2)  dst = cv2.warpAffine(img,M,(cols,rows))  plt.subplot(121),plt.imshow(img),plt.title('Input') plt.subplot(122),plt.imshow(dst),plt.title('Output') plt.show() 

See the result:

Affine Transformation

Perspective Transformation

For perspective transformation, you need a 3x3 transformation matrix. Straight lines will remain straight even after the transformation. To find this transformation matrix, you need 4 points on the input image and corresponding points on the output image. Among these 4 points, 3 of them should not be collinear. Then transformation matrix can be found by the function cv2.getPerspectiveTransform. Then apply cv2.warpPerspective with this 3x3 transformation matrix.

See the code below:

img = cv2.imread('sudokusmall.png') rows,cols,ch = img.shape  pts1 = np.float32([[56,65],[368,52],[28,387],[389,390]]) pts2 = np.float32([[0,0],[300,0],[0,300],[300,300]])  M = cv2.getPerspectiveTransform(pts1,pts2)  dst = cv2.warpPerspective(img,M,(300,300))  plt.subplot(121),plt.imshow(img),plt.title('Input') plt.subplot(122),plt.imshow(dst),plt.title('Output') plt.show() 

Result:

Perspective Transformation

Additional Resources

  1. “Computer Vision: Algorithms and Applications”, Richard Szeliski

Exercises

Help and Feedback

You did not find what you were looking for?
  • Ask a question on the Q&A forum.
  • If you think something is missing or wrong in the documentation, please file a bug report.


zmj 2017-10-12 15:28 发表评论

OpenCV detect partial circle with noise

$
0
0
https://stackoverflow.com/questions/26222525/opencv-detect-partial-circle-with-noise

using this as input (your own median filtered image (I've just cropped it):

enter image description here

First I "normalize" the image. I just stretch values, that smallest val is 0 and biggest val is 255, leading to this result: (maybe some real contrast enhancement is better)

enter image description here

after that I compute the threshold of that image with some fixed threshold (you might need to edit that and find a way to choose the threshold dynamically! a better contrast enhancement might help there)

enter image description here

from this image, I use some simple RANSAC circle detection(very similar to my answer in the linked semi-circle detection question), giving you this result as a best semi-sircle:

enter image description here

int main()


{

    //cv::Mat color = cv::imread("../inputData/semi_circle_contrast.png");

    cv::Mat color = cv::imread("../inputData/semi_circle_median.png");

    cv::Mat gray;


    // convert to grayscale

    cv::cvtColor(color, gray, CV_BGR2GRAY);


    // now map brightest pixel to 255 and smalles pixel val to 0. this is for easier finding of threshold

    double min, max;

    cv::minMaxLoc(gray,&min,&max);

    float sub = min;

    float mult = 255.0f/(float)(max-sub);

    cv::Mat normalized = gray - sub;

    normalized = mult * normalized;

    cv::imshow("normalized" , normalized);

    //--------------------------------


    // now compute threshold

    // TODO: this might ne a tricky task if noise differs...

    cv::Mat mask;

    //cv::threshold(input, mask, 0, 255, CV_THRESH_BINARY | CV_THRESH_OTSU);

    cv::threshold(normalized, mask, 100, 255, CV_THRESH_BINARY);


    std::vector<cv::Point2f> edgePositions;

    edgePositions = getPointPositions(mask);


    // create distance transform to efficiently evaluate distance to nearest edge

    cv::Mat dt;

    cv::distanceTransform(255-mask, dt,CV_DIST_L1, 3);


    //TODO: maybe seed random variable for real random numbers.


    unsigned int nIterations = 0;


    cv::Point2f bestCircleCenter;

    float bestCircleRadius;

    float bestCirclePercentage = 0;

    float minRadius = 50;   // TODO: ADJUST THIS PARAMETER TO YOUR NEEDS, otherwise smaller circles wont be detected or "small noise circles" will have a high percentage of completion


    //float minCirclePercentage = 0.2f;

    float minCirclePercentage = 0.05f;  // at least 5% of a circle must be present? maybe more...


    int maxNrOfIterations = edgePositions.size();   // TODO: adjust this parameter or include some real ransac criteria with inlier/outlier percentages to decide when to stop


    for(unsigned int its=0; its< maxNrOfIterations; ++its)

    {

        //RANSAC: randomly choose 3 point and create a circle:

        //TODO: choose randomly but more intelligent,

        //so that it is more likely to choose three points of a circle.

        //For example if there are many small circles, it is unlikely to randomly choose 3 points of the same circle.

        unsigned int idx1 = rand()%edgePositions.size();

        unsigned int idx2 = rand()%edgePositions.size();

        unsigned int idx3 = rand()%edgePositions.size();


        // we need 3 different samples:

        if(idx1 == idx2) continue;

        if(idx1 == idx3) continue;

        if(idx3 == idx2) continue;


        // create circle from 3 points:

        cv::Point2f center; float radius;

        getCircle(edgePositions[idx1],edgePositions[idx2],edgePositions[idx3],center,radius);


        // inlier set unused at the moment but could be used to approximate a (more robust) circle from alle inlier

        std::vector<cv::Point2f> inlierSet;


        //verify or falsify the circle by inlier counting:

        float cPerc = verifyCircle(dt,center,radius, inlierSet);


        // update best circle information if necessary

        if(cPerc >= bestCirclePercentage)

            if(radius >= minRadius)

        {

            bestCirclePercentage = cPerc;

            bestCircleRadius = radius;

            bestCircleCenter = center;

        }


    }


    // draw if good circle was found

    if(bestCirclePercentage >= minCirclePercentage)

        if(bestCircleRadius >= minRadius);

        cv::circle(color, bestCircleCenter,bestCircleRadius, cv::Scalar(255,255,0),1);


        cv::imshow("output",color);

        cv::imshow("mask",mask);

        cv::waitKey(0);


        return 0;

    }


float verifyCircle(cv::Mat dt, cv::Point2f center, float radius, std::vector<cv::Point2f> & inlierSet)
{
 unsigned int counter = 0;
 unsigned int inlier = 0;
 float minInlierDist = 2.0f;
 float maxInlierDistMax = 100.0f;
 float maxInlierDist = radius/25.0f;
 if(maxInlierDist<minInlierDist) maxInlierDist = minInlierDist;
 if(maxInlierDist>maxInlierDistMax) maxInlierDist = maxInlierDistMax;
 
 // choose samples along the circle and count inlier percentage
 for(float t =0; t<2*3.14159265359f; t+= 0.05f)
 {
     counter++;
     float cX = radius*cos(t) + center.x;
     float cY = radius*sin(t) + center.y;
 
     if(cX < dt.cols)
     if(cX >= 0)
     if(cY < dt.rows)
     if(cY >= 0)
     if(dt.at<float>(cY,cX) < maxInlierDist)
     {
        inlier++;
        inlierSet.push_back(cv::Point2f(cX,cY));
     }
 }
 
 return (float)inlier/float(counter);
}
 
 
inline void getCircle(cv::Point2f& p1,cv::Point2f& p2,cv::Point2f& p3, cv::Point2f& center, float& radius)
{
  float x1 = p1.x;
  float x2 = p2.x;
  float x3 = p3.x;
 
  float y1 = p1.y;
  float y2 = p2.y;
  float y3 = p3.y;
 
  // PLEASE CHECK FOR TYPOS IN THE FORMULA :)
  center.x = (x1*x1+y1*y1)*(y2-y3) + (x2*x2+y2*y2)*(y3-y1) + (x3*x3+y3*y3)*(y1-y2);
  center.x /= ( 2*(x1*(y2-y3) - y1*(x2-x3) + x2*y3 - x3*y2) );
 
  center.y = (x1*x1 + y1*y1)*(x3-x2) + (x2*x2+y2*y2)*(x1-x3) + (x3*x3 + y3*y3)*(x2-x1);
  center.y /= ( 2*(x1*(y2-y3) - y1*(x2-x3) + x2*y3 - x3*y2) );
 
  radius = sqrt((center.x-x1)*(center.x-x1) + (center.y-y1)*(center.y-y1));
}


std::vector<cv::Point2f> getPointPositions(cv::Mat binaryImage)
{
 std::vector<cv::Point2f> pointPositions;
 
 for(unsigned int y=0; y<binaryImage.rows; ++y)
 {
     //unsigned char* rowPtr = binaryImage.ptr<unsigned char>(y);
     for(unsigned int x=0; x<binaryImage.cols; ++x)
     {
         //if(rowPtr[x] > 0) pointPositions.push_back(cv::Point2i(x,y));
         if(binaryImage.at<unsigned char>(y,x) > 0) pointPositions.push_back(cv::Point2f(x,y));
     }
 }
 
 return pointPositions;
}


zmj 2017-10-17 13:39 发表评论
Viewing all 101 articles
Browse latest View live